Foundation Topics
Windows Server 2012 R2 Hardware Requirements
As with previous Windows versions, your hardware must meet certain requirements for Windows Server 2012 R2 to function properly. First of all, Windows Server 2012 R2 requires a 64-bit processor; Microsoft has discontinued 32-bit software with this release of Windows Server. Table 2-2 outlines the minimum and recommended hardware requirements for Windows Server 2012 R2 as provided by Microsoft:
Table 2-2 Windows Server 2012 R2 Hardware Requirements
| Component | Minimum Requirement | Microsoft Recommended |
| Processor | 1.4 GHz | 2 GHz or faster |
| Memory | 512 MB RAM | 2 GB RAM or greater |
| Available Disk Space | 32 GB | 40 GB or greater |
| Optical Drive | DVD-ROM drive | DVD-ROM drive |
| Display | Super VGA (800x600) monitor | XGA (1024x768) monitor |
In addition, you must have the usual I/O peripherals, including a keyboard and mouse or compatible pointing device and a wired or wireless network interface card (NIC). If you can connect to a network location on which you have copied the contents of the Windows Server 2012 R2 DVD-ROM, you are not required to have a DVD-ROM drive on your computer. As with any other operating system installation, you will receive improved performance if you have a faster processor and additional memory on your system.
Further, when you install Windows Server 2012 R2 on an Itanium-based computer, you must have an Intel Itanium 2 processor and additional hard disk space. Computers with more than 16 GB RAM require additional disk space for paging, hibernation, and dump files. With disk space at an all-time minimum cost, it is easy to acquire a high-capacity hard disk. You will certainly need plenty of disk space on a server that will be a domain controller in a large domain.
Microsoft recommends that you also perform the following actions before installing Windows Server 2012 R2:
- Disconnect uninterruptible power supply (UPS) devices: If you are using a UPS, disconnect its serial or USB cable before installing Windows Server 2012 R2. However, note that you do not need to disconnect other USB devices such as external hard drives, printers, and so on.
- Back up data: Perform a complete backup of configuration information for your servers, especially network infrastructure servers such as DHCP servers. The backup should include the boot and system partitions as well as the system state data.
- Disable antivirus software: Antivirus software can interfere with operating system installation.
- Run the Windows Memory Diagnostic tool: This tool tests your computer’s RAM. For more information, refer to “Utility Spotlight: Windows Memory Diagnostic” at http://technet.microsoft.com/en-us/magazine/2008.09.utilityspotlight.aspx?pr=blog.
- Provide mass storage drivers if needed: Save the driver file to appropriate media so that you can provide it during setup.
- Note that Windows Firewall is on by default: Server applications that require inbound connections will fail until you create inbound firewall rules that allow these connections. For more information, refer to “Windows Firewall with Advanced Security Overview” at http://technet.microsoft.com/en-us/library/hh831365.aspx.
- Prepare your Active Directory environment for Windows Server 2012 R2: Before adding a Windows Server 2012 R2 domain controller or updating an existing domain controller to Windows Server 2012 R2, prepare the domain and forest by running Adprep.exe. We discuss this tool in Chapter 13, “Installing Domain Controllers.”
Installing Windows Server 2012 R2
As already introduced in Chapter 1, “Introducing Windows Server 2012 R2,” you can install Windows Server 2012 R2 as either Server with a GUI, which presents a full graphical user interface, or Server Core, which presents only a command prompt window.
Installing a Windows Server Core Computer
As explained in Chapter 1, Windows Server Core includes a minimal version of the server software without the GUI; you perform all configuration tasks from the command prompt. Follow this procedure to install Windows Server Core and perform initial configuration tasks:
- Insert the Windows Server 2012 R2 DVD-ROM and turn on your computer. You should see a message informing you that Windows is copying temporary files; if not, you should access the BIOS setup program included with your computer and modify the boot sequence so that the computer boots from the DVD.
- After a few minutes, you receive the Windows Server 2012 R2 screen shown in Figure 2-1. Click Install now to begin the installation.
 Figure 2-1 Starting the installation of Windows Server 2012 R2.
 - Windows copies temporary files and then displays the Get important updates for Windows Setup screen shown in Figure 2-2. If you’re connected to the Internet, select Go online to install updates now (recommended).
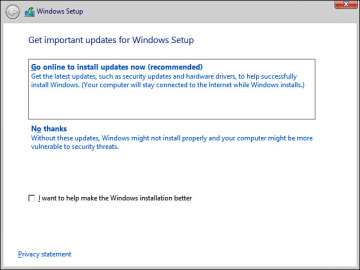 Figure 2-2 If you’re connected to the Internet, you should select the option to get updates.
 - On the next Install Windows screen, click Install now.
- You receive the options shown in Figure 2-3, which enable you to install the complete Standard or Datacenter version of Windows Server 2012 R2 with a GUI or Windows Server 2012 R2 Server Core. Select the Windows Server 2012 R2 Datacenter (Server Core Installation) option and then click Next.
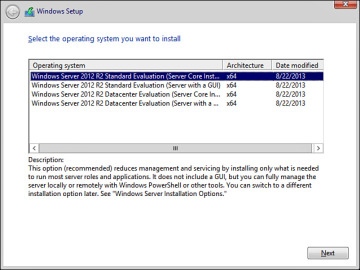 Figure 2-3 This screen enables you to select either the complete installation of Windows Server 2012 R2 or the Server Core option.
 - You are asked to accept the license terms. Select the check box labeled I accept the license terms and then click Next.
- You receive the options shown in Figure 2-4 to upgrade or install a clean copy of Windows Server 2012 R2. Select Custom (advanced) to install a clean copy of Windows Server 2012 R2. The upgrade option is available only if you have started the installation from within Windows Server 2008, Windows Server 2008 R2, or the original version of Windows Server 2012.
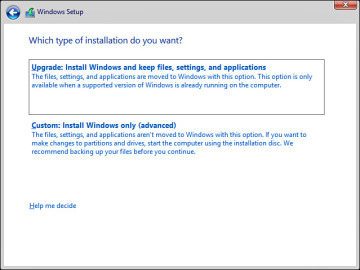 Figure 2-4 You have the option to upgrade when run from Windows Server 2008/R2/2012.
 - Select the disk on which you want to install Windows and then click Next.
- Take a coffee break while the installation proceeds. This takes some time (particularly when installing on a virtual machine), and the computer restarts several times. As shown in Figure 2-5, Setup charts the progress of installation.
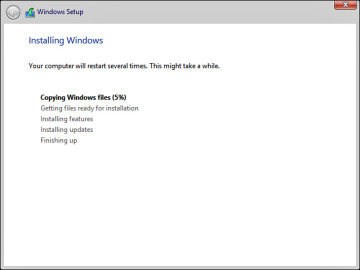 Figure 2-5 Windows Setup charts the progress of installing Windows Server 2012 R2.
 - After 15–30 minutes (depending on your hardware), Windows restarts a last time and informs you that your password must be changed before logging on for the first time. Click OK.
- Type and confirm a strong password. When informed that the password is changed, click OK. After a minute or so, the desktop appears, containing a command window but no Start screen or desktop icons (see Figure 2-6). This is the standard Windows Server Core interface.
 Figure 2-6 At startup, Windows Server Core 2012 R2 displays only a command window.
 - To set the correct time, type control timedate.cpl. By default, Server Core sets the time zone to Pacific Time. If you are in a different time zone, you will need to change this. Set the appropriate time zone, change the date and time if necessary, and then click OK.
- Windows installs Server Core with a randomly generated computer name. To set a name of your choice, type netdom renamecomputer %computername% /newname:ServerC1 (where, in this instance, ServerC1 is the name you’re assigning; substitute your desired server name).
- Windows warns you that the rename process might have an adverse impact on some services. Type Y to proceed.
- You are informed that the computer needs to be restarted in order to complete the rename. Type shutdown /r /t 0 to reboot your server.
- After the server reboots, press Ctrl+Alt+Delete and log on using the password you set in step 11.
Useful Server Core Commands
All configuration, management, and troubleshooting of Windows Server Core is done from the command line. Available utilities enable you to perform almost all regular configuration tasks in this fashion. In Windows Server 2012 and 2012 R2, many of the commands used with Server Core in Windows Server 2008 have been replaced by PowerShell cmdlets. Table 2-3 describes some of the more useful available commands.
Table 2-3 Useful Windows Server Core Commands and Cmdlets
| Command | Meaning |
| netdom join computername /domain:domainname | Joins an Active Directory domain. You will be prompted for the username and password of a user with domain administrator privileges. |
| Sconfig.cmd | Configures and manages a series of common Server Core installation properties. See Figure 2-7. |
| cscript scregedit.wsf | Enables automatic updates. |
| Get-WindowsFeature | Displays roles and features currently installed on the server. |
| Install-WindowsFeature | Adds roles or features. |
| Uninstall-WindowsFeature | Removes roles or features. |
| netsh interface IPv4 | Includes a series of subcommands that enable you to configure IPv4 networking. |
| netsh advfirewall | Includes subcommands that enable you to configure the Windows firewall. |
| Help | Provides a list of all available Windows Server Core commands. |
 Figure 2-7 The Sconfig.cmd utility enables you to perform many basic configuration actions on a Server Core computer.
Available commands also include most commands formerly used with MS-DOS and previous Windows versions. We discuss many Server Core commands and PowerShell cmdlets in various chapters of this book and other Cert Guide books in this series.
- Follow the procedure outlined earlier for installing Windows Server Core until you receive the screen previously shown in Figure 2-3.
- Select either Windows Server 2012 R2 Standard (Server with a GUI) or Windows Server 2012 R2 Datacenter (Server with a GUI), and then click Next.
- Complete steps 6–10 of the earlier procedure. Installation will take 15–45 minutes, depending on your hardware.
- Type and confirm a secure password. Windows informs you that your password has been changed. Click OK.
- Windows displays a Welcome message and prepares your desktop. Then the desktop with Server Manager shown in Figure 2-8 appears.
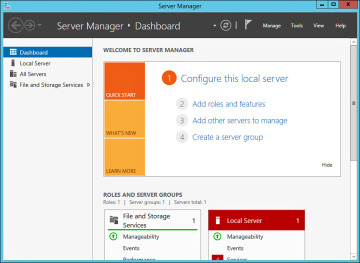 Figure 2-8 When you log on to Server with a GUI for the first time, Server Manager appears.
After you have performed the initial configuration steps, you will be prompted to press Ctrl+Alt+Delete and enter your password when you restart your server.
Upgrading a Windows Server 2008 Computer
You can upgrade a computer running Windows Server 2008 R2 with Service Pack 1 (SP1) or later to Windows Server 2012 R2, provided that the computer meets the hardware requirements for Windows Server 2012 R2. You cannot upgrade a Windows Server 2003 or older computer or a computer running any client version of Windows to Windows Server 2012 R2.
To upgrade to Windows Server 2012 R2, proceed as follows:
- While logged on to Windows Server 2008 R2 as an administrator, insert the Windows Server 2012 R2 DVD-ROM.
- When the Install Windows screen appears, click Install now.
- Select your operating system, either the standard or Windows Core version of Windows Server 2012 R2; then click Next.
- Accept the licensing terms and then click Next.
- On the Which Type of Installation Do You Want? page, select Upgrade.
- Windows checks compatibility of your hardware and software and displays a compatibility report that informs you of any potential upgrade problems. Review this report and make any changes you feel are required. When you are ready to proceed, click Next.
- Take a lunch break while the upgrade proceeds. This will take 60 minutes or longer, depending on your hardware configuration or use of virtual computing software. The server will reboot three or four times.
- After the final reboot, log on using the password previously used in Windows Server 2008 R2. Windows prepares your desktop and displays the Server Manager tool as previously shown in Figure 2-8.
Converting Between Core and GUI
You can convert the full GUI version of Windows Server 2012 R2 to Server Core or vice versa at any time; further, you can interconvert the GUI version between any of the three options described in Chapter 1.
Use the following procedure to convert the full GUI server to Server Core:

- From the Search charm, type powershell and select Windows PowerShell.
- Type the following cmdlet:
Uninstall-WindowsFeature Server-Gui-Mgmt-Infra –Restart
- A display on the PowerShell window tracks the removal process, which takes several minutes. A Configuring Windows features message then appears as the GUI is removed. After a few more minutes, the server restarts. When the logon screen appears, press Ctrl+Alt+Delete and log back on as an administrator.
Use the following procedure to convert a Server Core computer to run the full GUI:
- From the administrative command prompt, type powershell.
- Type the following command:
Get-WindowsImage -ImagePath <path to wim>\install.wim
- This command returns the index number for the server with a GUI image. Then type the following command:
Install-WindowsFeature Server-Gui-Mgmt-Infra, Server-Gui-Shell –
Restart –Source wim:<path to wim>\install.wim:<Index #> - Wait as Windows configures features and restarts; then press Ctrl+Alt+Delete and log back on as an administrator.
If you are converting a server that was originally installed in GUI mode back to GUI from Server Core, the procedure is slightly simpler. Use the following PowerShell command in place of those given in steps 2 and 3:
Install-WindowsFeature Server-Gui-Mgmt-Infra,Server-Gui-Shell
–Restart
To install the complete desktop experience on your server (including access to Windows Store apps as in Windows 8 or Windows 8.1), use the following PowerShell command and then restart your computer. This mode adds a link to Windows Store on the Start screen, as shown in Figure 2-9:
Install-WindowsFeature Desktop-Experience
 Figure 2-9 The complete desktop experience in Windows Server 2012 R2 enables you to add Windows Store apps.
Installing the minimal server interface on your server requires you to remove the Start screen shell. Use the following PowerShell command and then restart your computer. You receive a command prompt window and the Server Manager console as previously shown in Figure 2-8.
Uninstall-WindowsFeature Server-Gui-Shell
Delegation of Server Administration
As an organization grows, administration of servers can become become quite overwhelming to manage. To help balance the workload and create a smooth support process, a delegation model should be implemented. Implementing a delegation model involves the following:
- Preparing for a delegation model
- Establishing delegate access
- Leveraging Active Directory
- Identifying administration tools
Preparing for a Delegation Model
Preparing for a delegation model requires some planning up front. Deciding how to manage your systems administration can be a frustrating task. The key to success is to define a model that best works for your situation, agree upon the long-term strategy, and discipline those involved to stick with the model. There are three basic strategies to select from when deciding how to manage your environment:
- Decentralized: This is typically designed for small mom-and-pop shops or even home offices. In this model, administrators are present at each site and all share the same responsibilities and access to the servers. This model typically introduces challenges with scalability and standardizations.
- Centralized: Typically found in medium to large organizations, the centralized model focuses on driving standards and consistent management from a central site or from a central group of administrators. Branch sites might employ desktop engineers who have been granted local admin rights to workstations but limited access to servers. In many cases, the centralized approach is what the decentralized model evolves into overtime.
- Shared/Delegated: While a shared/delegated model can be used for an organization of any size, it is typically adopted by large/enterprise class organizations with a larger IT workforce. Containing characteristics of both decentralized and centralized models, the shared or delegated approach focuses on centralized policies and procedures governed by the enterprise admins. Enterprise admins “deputize” junior admins at each site to manage local servers and drive a consistent process among all sites. This approach is hierarchical in nature in that many layers of administration can be defined.For example, the main office might contain the majority of the systems. These systems are managed by senior administrators or an enterprise admin group. Branch sites might contain locally significant servers such as file servers that are managed by site admins and/or the enterprise admin group. Desktop engineers might be delegated administrative access to all desktops but might escalate issues to site admins or even enterprise admins if necessary.
Establishing Delegate Access
Once a delegation model has been selected, the next step is to decide how to delegate access. Depending on the server, installed roles, and applications installed, there are different ways to delegate access. In some cases, applications or roles include an interface where elevated access is granted. In most other situations, local built-in groups can be used to grant different access to different delegates depending on their function.
For example, suppose you have delegated backup duties to a small team of junior administrators. To grant or delegate the necessary permissions, you might decide to nest, rather than add, the junior admins’ domain accounts to the built-in local backup operators group on one or more servers. To help streamline this in larger organizations, you might consider additional layers of group nesting along with group policy to push down the elevated access to a group of servers. This method provides a more scalable solution as expanding delegate access is as simple as adding more junior admin accounts to a domain group. The domain group is then automatically added to the backup operators local group on the servers. Active Directory will be discussed in more detail later. Refer to Table 2-4 for a listing of built-in local groups and their functions.
Table 2-4 Built-in Local Groups
| Group | Function |
| Access Control Assistance Operators | Remotely query permissions or authentication attributes for resources on the computer. |
| Administrators | Grants full access and control to the computer. Allows members to change and manage permissions and access to the computer. |
| Backup Operators | Ability to back up and restore files regardless of the permissions assigned to the folder or files. These users are unable to modify and manage permissions. |
| Certificate Services DCOM Access | Members are allowed to connect to Certificate Authorities. |
| Cryptographic Operators | Perform Cryptographic operations. |
| Distributed COM Users | Start, activate, and use DCOM objects. |
| Event Log Readers | Ability to read event logs on the computer. |
| Guests | Users are granted virtually no access to the system other than to use the Internet and basic applications. They are granted temporary profiles upon logon. |
| Hyper-V Administrators | Grants full control over Hyper-V. |
| IIS Users | Used by IIS Web Services. |
| Network Configuration Operators | Ability to make changes to TCP/IP Settings and release and renew IP addresses. |
| Performance Log Users | Manage and schedule performance counters logs and alerts on the computer. |
| Performance Monitor Users | Ability to monitor performance counters and read performance counter data. |
| Power Users | Typically used to provide elevated privileges for legacy applications. |
| Print Operators | Administer printers and print jobs on the server. |
| Remote Desktop Users | Members of this group are granted permission to log onto the computer remotely. |
| Replicator | Manages domain replication functions. |
| Users | Limited access to log on to the computer. Allows users to run applications, use local devices and peripherals but not make administrative changes. |
| WinRMRemoteWMIUsers | Ability to access WMI resources. |
Leveraging Active Directory
One of the major benefits of Active Directory is that you can split up administrative tasks among various individuals using the AD DS Delegation of Control Wizard. You can assign different sets of administrative responsibility to different users, and these can include segments of the directory structure such as OUs or sites. The following are several benefits of delegating administrative control:
- You can assign subsets of administrative tasks to users and groups.
- You can assign responsibility of a limited portion of the domain, such as OUs or sites, to users or groups.
- You can use a nested hierarchy of OUs for even more granular control over which users can perform certain administrative tasks.
- You can enhance network security by placing more restrictive limits on the membership of powerful groups such as Domain Admins, Enterprise Admins, and Schema Admins.
When designing your AD DS forest structure, you should keep in mind the administrative requirements of each domain. Each domain has the capability to contain a different OU hierarchy. The forest administrators, who are members of the Enterprise Admins group, are automatically granted the ability to create an OU hierarchy in any domain within the entire forest. Domain administrators, who are members of the Domain Admins group in each separate domain, by default are granted the right to create an OU hierarchy within their own domain.
When you initially create your OU design, you should do so to enable administration. After that, you should create any additional OUs required for the application of Group Policy and management of computers. Delegation of Control and management of AD DS are discussed in more detail later.
Identifying Administration Tools
The final step in delegating administrative duties is identifying the toolsets available to your delegates. Microsoft has provided us with the following tools to help with administrative tasks:
- Server Manager: Server Manager provides the ability to manage local or remote servers from a central location.
- Windows PowerShell Web Access: As we have seen previously, PowerShell is a powerful command-line tool that has been available since Windows Server 2008. As an improvement to Server 2012 R2, PowerShell now has the ability to be executed over the Web through the use of a Windows PowerShell Web Access Gateway. This is available as an installable feature through Server Manager.
- Windows PowerShell Desired State Configuration (DSC): PowerShell Desired State Configuration (DSC) is a PowerShell extension released with Windows Server 2012 R2 and Windows 8.1. We discuss DSC in more detail in the next section.
- Microsoft Management Console (MMC): As with previous versions of Windows, the MMC is still a powerful tool used by administrators to manage local and remote servers. You can create custom read-only MMC consoles with specific snap-ins containing only those tools required for the specific delegate function.
- Remote Server Administration Tools: Provides a set of tools to be used with client computers running Windows 8/8.1. It includes Server Manager, MMC snap-ins, PowerShell cmdlets, and additional command-line tools used to manage Windows Server 2012 R2 Core and Full installations. You can download Remote Server Administration tools from the Microsoft Download Center as a standalone installer.
Windows PowerShell Desired State Configuration
As mentioned previously, Windows PowerShell Desired State Configuration (DSC) was designed to enhance the levels of automation through the use of PowerShell 4.0. It helps administrators cut down on repetitive tasks by defining prebuilt configurations that accompany PowerShell 4.0 cmdlets. Configuration parameters are saved in a Managed Object File (MOF) and can be used as a baseline for comparison or as a template for new deployments. DSC is often used in the following situations:
- You need to verify or test applied system configurations against a configuration baseline defined in the DSC configuration.
- When using PowerShell to install or remove Server Roles/Features or installation packages based on specific configurations.
- You need to review or make changes to registry settings, environment variables, processes, or services.
- You need to manage local users/groups to ensure that they are configured according to DSC.
To function properly, DSC requires the following components:
- A strong knowledge of PowerShell
- Installation of the Windows PowerShell Desired State Configuration Service feature
- .NET Framework 4.5
- Windows Communication Foundation (WCF) Services
- Web Server (IIS) and related role services/features
- Clients running at least Windows 7 or Windows Server 2008 R2 with Windows Management Framework 4.0
Installing and Configuring DSC
DSC works via two basic methods: Pull and Push. The Pull method works through the use of a Pull Server. Using this method, you can configure a server as the Pull Server, which acts as central configuration repository storing the configuration data for computers. The Pull Server stores DSC resources required by the target computers, also known as nodes. In large environments, nodes can be configured to pull from the server as they come online. The second method is the Push method. In smaller implementations, a central server can be configured to Push DSC configurations. The down side is that this doesn’t always guarantee that all nodes receive the updated configuration. As an administrator, you also have the ability to use a combination of both Pull and Push methods.
DSC works through the basis of defining configurations within scripts. Using Notepad, you can build a custom DSC configuration. Configurations contain several components, all of which are organized within a configuration block. The keyword Configuration tells PowerShell that a specific configuration is to follow. The use of braces { } identify the start and end of the configuration. Together, both of these items create the foundation of a configuration block. The basic structure of a configuration block is
Configuration MyConfigName
{

}
Inside the configuration block, node blocks are identified. A node represents a computer in the environment. Nodes are used when you need to apply a configuration block to a specific computer or computers. Like configuration blocks, node blocks start and end with a brace { }. Multiple node blocks can be created within a configuration block, although a configuration block does not have to contain any node blocks. Depending on the requirements, you might need to use node blocks.
Configuration MyConfigName
{
       Node "MyComputer1"
             {

             }
}
Inside the node blocks, resource blocks can be identified. Resource blocks are used to configure specific resources. These can be configured manually, or you can use several prebuilt resources available within the PowerShell framework. Some of the built-in resources include
- DSC Configuration Archive: For working with compressed/archive files
- DSC Configuration Environment: For managing computer environmental configurations
- DSC Configuration File: For manging files and folders
- DSC Configuration Group: For managing local groups on target nodes
- DSC Configuration Log: For writing messages to the DSC event log
- DSC Configuration Package: For installing msi/exe packages
- DSC Configuration Process: For managing processes on target nodes
- DSC Configuration Registry: For managing registry keys on target nodes
- DSC Configuration Role: For adding or removing Windows features and roles on target nodes
- DSC Configuration Script: For running PowerShell script blocks on target nodes
- DSC Configuration Service: For managing services on target nodes
- DSC Configuration User: For managing local user accounts on target nodes
Resource blocks are identified by a resource name followed by an identifier. Again, use braces to establish the start/finish boundary. For example, to add configuration details to ensure that the Web-Server role is installed for MyComputer1, use the following syntax:
Configuration MyConfigName
{
      Node "MyComputer1"
             {

                   WindowsFeature MyRoles
                           {
                           Ensure = "Present"
                           Name = "Web-Server"
                           }
             }
}
After you have created the appropriate configurations, save it as a PowerShell script. To invoke the configuration, execute it via an administrative PowerShell session. Invoking the configuration creates the MOF file in the working directory containing the configuration block script. To execute the configuration, run the command:
Start-DscConfiguration –Wait –Verbose –Path .\MyConfigName
Configuring Offline Server Images
In any large-scale deployment, imaging technology will be one of your strongest allies. Microsoft has continued to evolve its imaging process through enhancements made to the Windows Deployment Services (WDS) role. WDS is covered in the 70-411 Cert Guide, but in this section, we will assume you already have a prebuilt image and are looking to perform offline servicing of the image.
So what is meant by servicing an image, and why offline? Historically speaking, updates to images required the administrator to deploy a new computer from the image, run through any customizations or updates, repackage the image, and upload it back to the repository. This is often a lengthy process—especially when only minor updates are required. For these instances, Microsoft has provided the ability to inject updates to a Windows image file (.wim) or virtual hard disk (.vhd or .vhdx) via the command line. Scenarios in which images require updating include
- Enable or disable Windows roles and features
- Add or remove drivers or installable packages such as hotfixes
- Perform an inventory of installed packages, drivers, features, and so on
- Modify logging abilities to help post deployment troubleshooting
- Modify the offlineServicing section of an Unattend.xml answer file
- Configure international settings
- Upgrade the installation to a higher edition of Windows
Deployment Image Servicing and Management
Servicing an image offline requires an understanding of the Deployment Image Servicing and Management (DISM) tool. DISM is a command-line tool included in Windows Server 2012 R2. For previous installations of Windows it is also available within the Windows Automated Installation Kit (AIK), which can be downloaded from the Microsoft Download Center.
DISM takes the legwork out of the mix by enabling an administrator to mount the image file, similar to mounting a hard disk, and issue commands to update the image. When the updating is complete, changes are committed to the image and the file is unmounted, in which case the image is ready for the next deployment. Some key points and best practices to consider when using DISM:
- Must be run as administrator.
- Service an image offline whenever possible.
- If Windows image files are split or spanned across multiple types of media, you must copy them centrally to a single folder to service. Without this, mounting the image is not possible.
- Keep architecture consistent, meaning don’t inject x64 drivers into x86 images.
- Remote image updates is not currently supported. To make any changes, you must first copy the Windows image to the local machine, perform the necessary updates, and then copy the image back to the repository.
- After deployment, use the system file checker sfc.exe /verifyonly option.
There are several parameters you should understand when servicing images. Table 2-5 outlines some of the key parameters:
Table 2-5 Useful DISM Parameters
| Command | Meaning |
| /Get-ImageInfo | Used to gather information from the image file such as index number, image name, description, and image size. |
| /ImageFile | Used to identify the location of the source image file. |
| /Mount-Image | Parameter used to mount the image. When mounting the image, you must also specify an in index number or the name associated with the image. This information can be extracted from the /Get-ImageInfo parameter. |
| /MountDir | Directory in which the image is mounted to. For optimal performance, this should be on the local computer that is updating the image. Dism /Mount-Image /ImageFile:C:\TestImages\TestImage.wim /Name:“Image Name” /Mountdir:C:\MountedImage |
| /Cleanup-Mountpoints | In some cases images might become locked/orphaned and are unable to be remounted. Use this switch when experiencing trouble with mounting images that might have been previously mounted. |
| /Add-Package | Adds one or more install packages or cabinet files (.cab) to a mounted image. When applying multiple packages, packages are listed in the order in which they should be installed. /Add-Package /PackagePath:[package path\package.cab] /PackagePath:[second package path\package2.cab] |
| /Add-Driver | Adds a driver to the offline image. For third-party drivers, you might choose the /ForceUnsigned switch. |
| /Remove-Driver | Removes a driver from the offline image. |
| /Commit-Image | Applies changes made to a mounted image and leaves the image mounted for additional changes. |
| /Get-Packages | Produces a list of Packages from the mounted image in the mount directory. This can also be piped > to a .txt file for easy reading. |
| /Get-Features | Produces a list of features by their case-sensitive name and their enabled/disabled status. This can also be piped > to a .txt file for easy reading. It’s used in conjunction with /Get-FeatureInfo /FeatureName:[FeatureName] to output additional details for the feature. |
| /Enable-Feature | Enables a specific feature. |
| /Disable-Feature | Disables a specific feature. |
| /Remove-Package | Removes an installed package. |
| /Unmount-Image | Unmounts the image. Use the /commit or /discard switch to apply or cancel any changes made before the image is unmounted. |
| /Set-Edition | Used to change an offline windows image to a higher edition. This might also be done online with the /AcceptEula and /ProductKey switches. |
Using DISM to Enable Remote Desktop Services
Now that you have an understanding of DISM and some of the key options, let’s see it in action by enabling the Remote Desktop Services feature in an offline image. The first thing you need to do is obtain a copy of the source image. In this example, we will use one of the default Windows image files found on the Server installation media and extracted by a WDS server. Again, WDS is covered in more detail in the 70-411 Exam Cert Guide. To enable a feature in an offline image, perform the following steps:
Gather identifying information from the image using the /Get-ImageInfo option as shown in Figure 2-10.
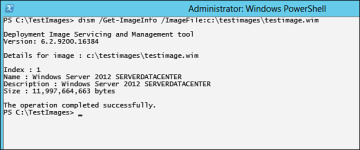 Figure 2-10 Dism /Get-ImageInfo
- Using either the index number or name of the image, mount the image to a temporary mount directory. This will extract the contents of the image (Figure 2-11) to a directory structure in the temp mount directory specified. This process might take time depending on the speed of your computer.
 Figure 2-11 Dism /Mount-Image.
 - Review the current state of the Remote-Desktop-Services feature. Shown in Figure 2-12, take notice that the feature is currently disabled.
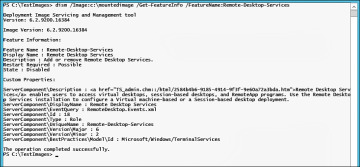 Figure 2-12 Dism /Get-FeatureInfo /FeatureName:Remote-Desktop-Services.
 - Enable the Remote-Desktop-Services feature in the offline image by executing the command shown in Figure 2-13.
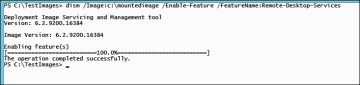 Figure 2-13 Dism /Enable-Feature /FeatureName:Remote-Desktop-Services.
 - Verify that the feature has been enabled using the Dism /Get-FeatureInfo command as shown in Figure 2-14.
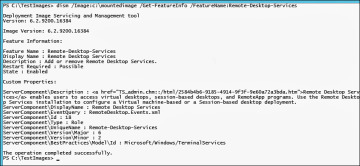 Figure 2-14 Change Verification—Dism /Get-FeatureInfo /FeatureName:Remote-Desktop-Services.
 - Commit changes to the image and unmount the .wim file, as shown in Figure 2-15. This will repackage the image file with the changes made. It might take some time depending on the speed of your computer.
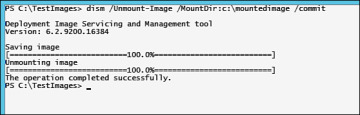 Figure 2-15 Dism /Unmount-Image /commit.
Configuring Remote Server Roles
As discussed previously, remote management of servers is extremely helpful for an administrator, especially in scenarios in which your organization is driving a centralized management approach or if you are managing a group of Server Core installations.
Before remote management can occur, the remote servers must be configured to enable remote management. This is on by default for new installations but can be changed by navigating to the Local Server properties of Server Manager as shown in Figure 2-16.
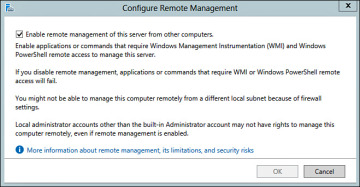 Figure 2-16 Server Manager Remote Management.
Similarly, remote management can be also be configured using the PowerShell command Configure-SMRemoting.exe -Enable or the –Disable switch if choosing to disable the service.
Once enabled for remote management, use the Add other servers to manage feature from the Server Manager Dashboard. The Add Servers dialog enables you to search for remote servers using Active Directory by importing a list from a text file or by using DNS as shown in Figure 2-17.
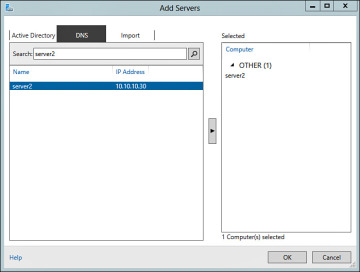 Figure 2-17 Add Servers Dialog Box.
After adding a remote server, it will be listed under the Server Manager > All Servers group. To perform a remote administrative task, such as Adding Roles and Features, highlight the remote server and right-click to bring up the list of remote management options as shown in Figure 2-18.
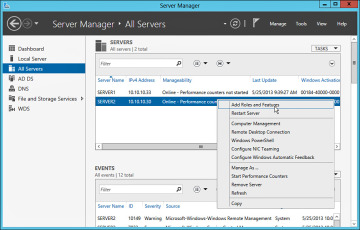 Figure 2-18 Adding Roles and Features Remotely.
From this point, step through the Add Roles and Features Wizard as you have done previously. The only difference this time is to select the remote server previously added. To ensure the proper remote server is selected, take note of the destination server listed in the upper-right corner of the dialog box, as shown in Figure 2-19.
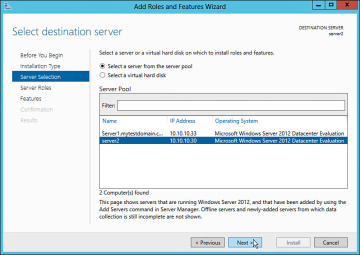 Figure 2-19 Adding Roles and Features to Destination Server.
After you have installed the role, you now have the ability to manage and configure services associated with the role centrally from Server Manager on your managing server. In addition to Server Manager, PowerShell can be another powerful tool to simplify the installation and management of server roles remotely.
Using PowerShell, an administrator can perform a series of commands. Some common commands are outlined in Table 2-6.
Table 2-6 PowerShell Remote Server Commands
| Command | Meaning |
| Get-Windows Feature –ComputerName [remote computer name] | Retrieves a list of roles and features installed on the remote server specified |
| Install-WindowsFeature –Name [feature name] –ComputerName [remote computer name] -Restart | Installs a specific feature to the destination computer listed. Issues a restart if required |
| Uninstall-WindowsFeature –Name [feature name] –ComputerName [remote computer name] -Restart | Removes a specific feature to the destination computer listed. Issues a restart if required. |
Configuring Windows Server 2012 R2 Services
Windows services have been around for some time. If you recall, a service is an application that runs in the background without a traditional user interface or requiring user interaction to complete its core function. Services and their configurations are stored in a database known as the Service Control Database. Information is also stored under subkeys located in the Registry. Many services are installed and configured by default when the operating system or additional roles are installed. Examples of services include Windows Print Spooler, Windows Firewall, Windows Event Log, Windows Time, and so on.
Depending on the scenario, some services require additional configuration and management. As with all administrative operations, managing services also requires the proper permissions. Members of the local administrators group, account operators, domain admins, or higher all have the ability to manage services by default. Microsoft has provided two methods for managing services, the services.msc snap-in for the Microsoft Management Console (MMC) and the Service Controller configuration sc config command. An administrator will use these methods to perform the following:
- Local and remote administration of services
- Configuration of custom developed services
- Start, stop, pause, resume, or disable services
- Configure recovery actions if a service fails
- Run services as a specific user
- Enable or disable services for certain hardware profiles
- View service status and details
Services.msc
To manage services via a GUI, use the Services.msc snap-in. The services snap-in, as shown in Figure 2-20, can be launched by searching for services.msc from the Charms bar or by navigating to Start > Administrative Tools > Services.
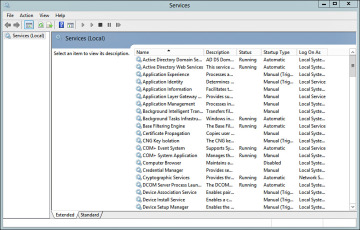 Figure 2-20 Services Snap-in for Microsoft Management Console.
In the instances where services need to be managed remotely from a central console, you can add the Services snap-in to a custom Microsoft Management Console. To do this, launch the MMC application from the Search charm, add the Services snap-in to the console, and specify the name of another computer or browse to it using the Browse button as shown in Figure 2-21.
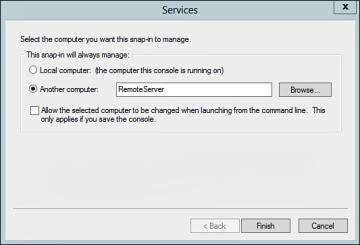 Figure 2-21 Remote Services Management.
Regardless of local or remote, a handful of items are configurable from the Services snap-in. Each service listed has a series of configurable properties. For example, Figure 2-22 illustrates the Properties dialog box for the Windows Firewall service (MpsSvc).
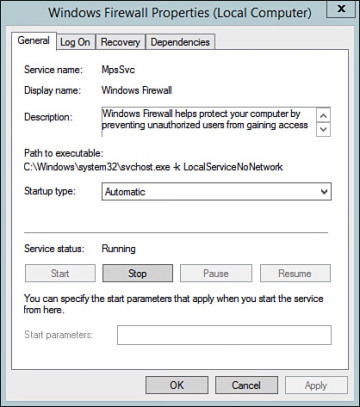 Figure 2-22 Windows Firewall (MpsSvc) Properties Dialog Box.
As you can see, several configurable items are grouped into different tabs as outlined in Table 2-7.
Table 2-7 Configurable Properties for Services
| Property Tab | Description |
| General | Used to view information about the service such as:
|
| Log On | Used to configure the account used to start the service upon boot up. In most cases, this is defaulted to the Local Service or System built in accounts. If a specific account has been delegated the ability to run the service, this tab provides the ability to supply the authoritative credentials. |
| Recovery | Provides recovery options and the automated responses if the service fails. |
| Dependencies | Lists the dependant and depending services or applications for the specific service. |
SC Commands
For local or remote management through the command line, Microsoft has included the ability to interface with the Service Controller using the C:\Windows\System32\SC.exe application. Launch the application by opening an Admin Command Prompt by right-clicking the Start button and choosing Command Prompt (Admin). SC.exe is particularly useful when working with Server Cores and for testing/troubleshooting issues. Commonly used SC commands are listed in Table 2-8.
Table 2-8 Common SC Commands
| Command | Meaning |
| SC Query | Queries a server for Service Status. Outputs information such as Service Name, Display Name, Type, and State of the service.SC [\\ServerName] Query |
| SC [Start, Stop, Pause, Continue] | Executes command to start, pause/continue, or stop a service.SC [\\ServerName] [Start/Stop/ Pause/Continue] [ServiceName] |
| SC Create | Creates a new service in the Service Control Managers database. The startup type, location to the binary path, display name, and so on are among the configuration options for this command. |
| SC Config | Configures local or remote services.SC [\\ServerName] config [ServiceName] [options] Common Options:
|
| SC delete | Deletes a service.SC [\\ServerName] delete [ServiceName] |
| SC description | Provides or updates the user friendly name, or description of a service.SC [\\ServerName] description [ServiceName] [Description] |
| SC failure | Sets the services automatic recovery options if a failure occurs.SC [\\ServerName] failure [ServiceName] [Options] Common Options:
|
Configuring NIC Teaming
NIC Teaming, also known as Load Balancing/Fail Over (LBFO), is a strategy used to increase network availability and overall performance. Multiple network interface cards are joined together and operate as a single entity. Previously, NIC Teaming was left for the manufacturers to provide a tool. Today, NIC Teaming is included in Windows Server 2012 R2 to provide the following capabilities:
- High Availability: A server can contain multiple network cards, each connected to a different network switch part of the same network segment. This scenario provides high network link availability in the event of a single NIC failure, single switch failure, or single link failure.
- Increased Throughput: Multiple network interface cards can be teamed together to provide increased throughput or load-balancing capabilities. The aggregation of multiple links provides a “larger pipe” to connect to the network.
Configure NIC Teaming via GUI
You can launch the NIC Teaming configuration interface, as shown in Figure 2-23, from the Server Manager Local screen. To configure NIC Teaming via GUI, perform the following steps:
- From the NIC Teaming interface, highlight the available adapters to be added to the team as shown in Figure 2-23.
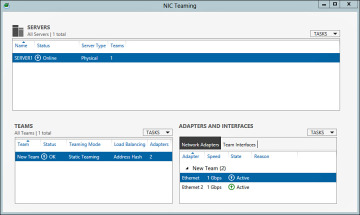 Figure 2-23 NIC Teaming Configuration Interface.
 - Once highlighted, select Add to New Team from the Tasks drop-down list. This will launch the New team dialog box.
- Type a Team name in the NIC Teaming dialog box as shown in Figure 2-24. Confirm that all appropriate adapters are checked.
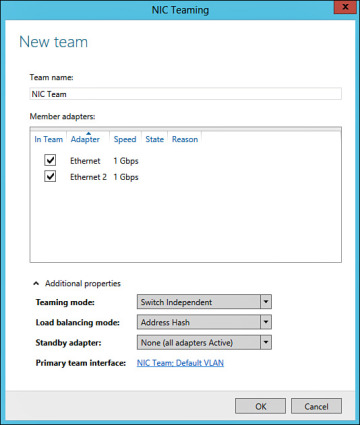 Figure 2-24 New Team Dialog Box.
 - Expand the Additional Properties drop-down and choose the appropriate Teaming mode. The following modes can be selected:
- Static Teaming: This mode requires custom configurations on the switch and host to identify the links as being part of the team. Static Teaming is considered a Switched Dependent mode because it depends on the switch for configuration. It is used for custom scenarios with supported switches where more granular or manual control is required.
- Switched Independent: Refers to the ability of the NIC Team to manage the connections to the switches and keeps track of the teams’ connection state. This is the most common teaming method as it supports just about any Ethernet switch. This option enables the NIC Team to split adapters’ connections between one or multiple switches.Because the Team manages the connection states, Switched Independent mode also provides an option for Active/Active or Active/Standby teaming. In Active/Active, all links are used for load balancing and throughput. For Active/Standby teaming, one link can be designated as the active link where others are remaining passive. The passive links stand by and take over during a failover event resulting from the active link failing.
- LACP: Link Aggregation Control Protocol (LACP) is a Switched-Dependent mode used to dynamically identify and aggregate links between a host and switch. The use of enterprise classed managed switches is required.
- Choose the appropriate load balancing mode from the following options:
- Address Hash: Load balances outbound network traffic across all active NICs. Inbound traffic is received by only one NIC in the team. This mode is typically seen with web servers.
- Hyper-V Port: Provides improved support for load balancing between virtual machines (VMs). Hyper-V works with the NIC Team to load balance and deliver VM traffic over specific NICs.
- Select the appropriate Standy adapter by selecting a specific adapter or choosing None where all adapters remain active.
- Confirm the Primary team interface. This enables you to choose the default or specific Virtual Local Area Network (VLAN).
- Click OK when complete.
After you have successfully configured a NIC Team, a new logical adapter will be available for management under the Network and Sharing Center. From here, you can manage adapter settings much like you have done previously with a traditional adapter. In the event that you decide to remove the NIC Team, the NIC Team user interface will return the adapters to the previous state prior to teaming.
www.pearsonitcertification.com


Hi Mike, first thanks for the work arnuod , still dont understand why Microsoft didnt change it , because your are able to select domain local security groups when grant send-as permissions.But i got a small other issue with exchange 2010, i am using the domain local security group to set grant permissions to a shared mailbox. for a unknow reason the attribute msExchDelegateListLink of the shared mailbox does not get filled in. so users who are member of that group does not get the shared mailbox automatically in their outlook 2010. if i add the permissions per user the attribute get filledin within a few minutes and trhe users sees the shared mailbox in their outlook after 3 min. any help is greatley appriciated
ReplyDelete